Systematic Review Robot
User Manual
Systematic Review Robot Desktop overview
Below is an image of Systematic Review Robot Desktop, following by the decription of each segment.
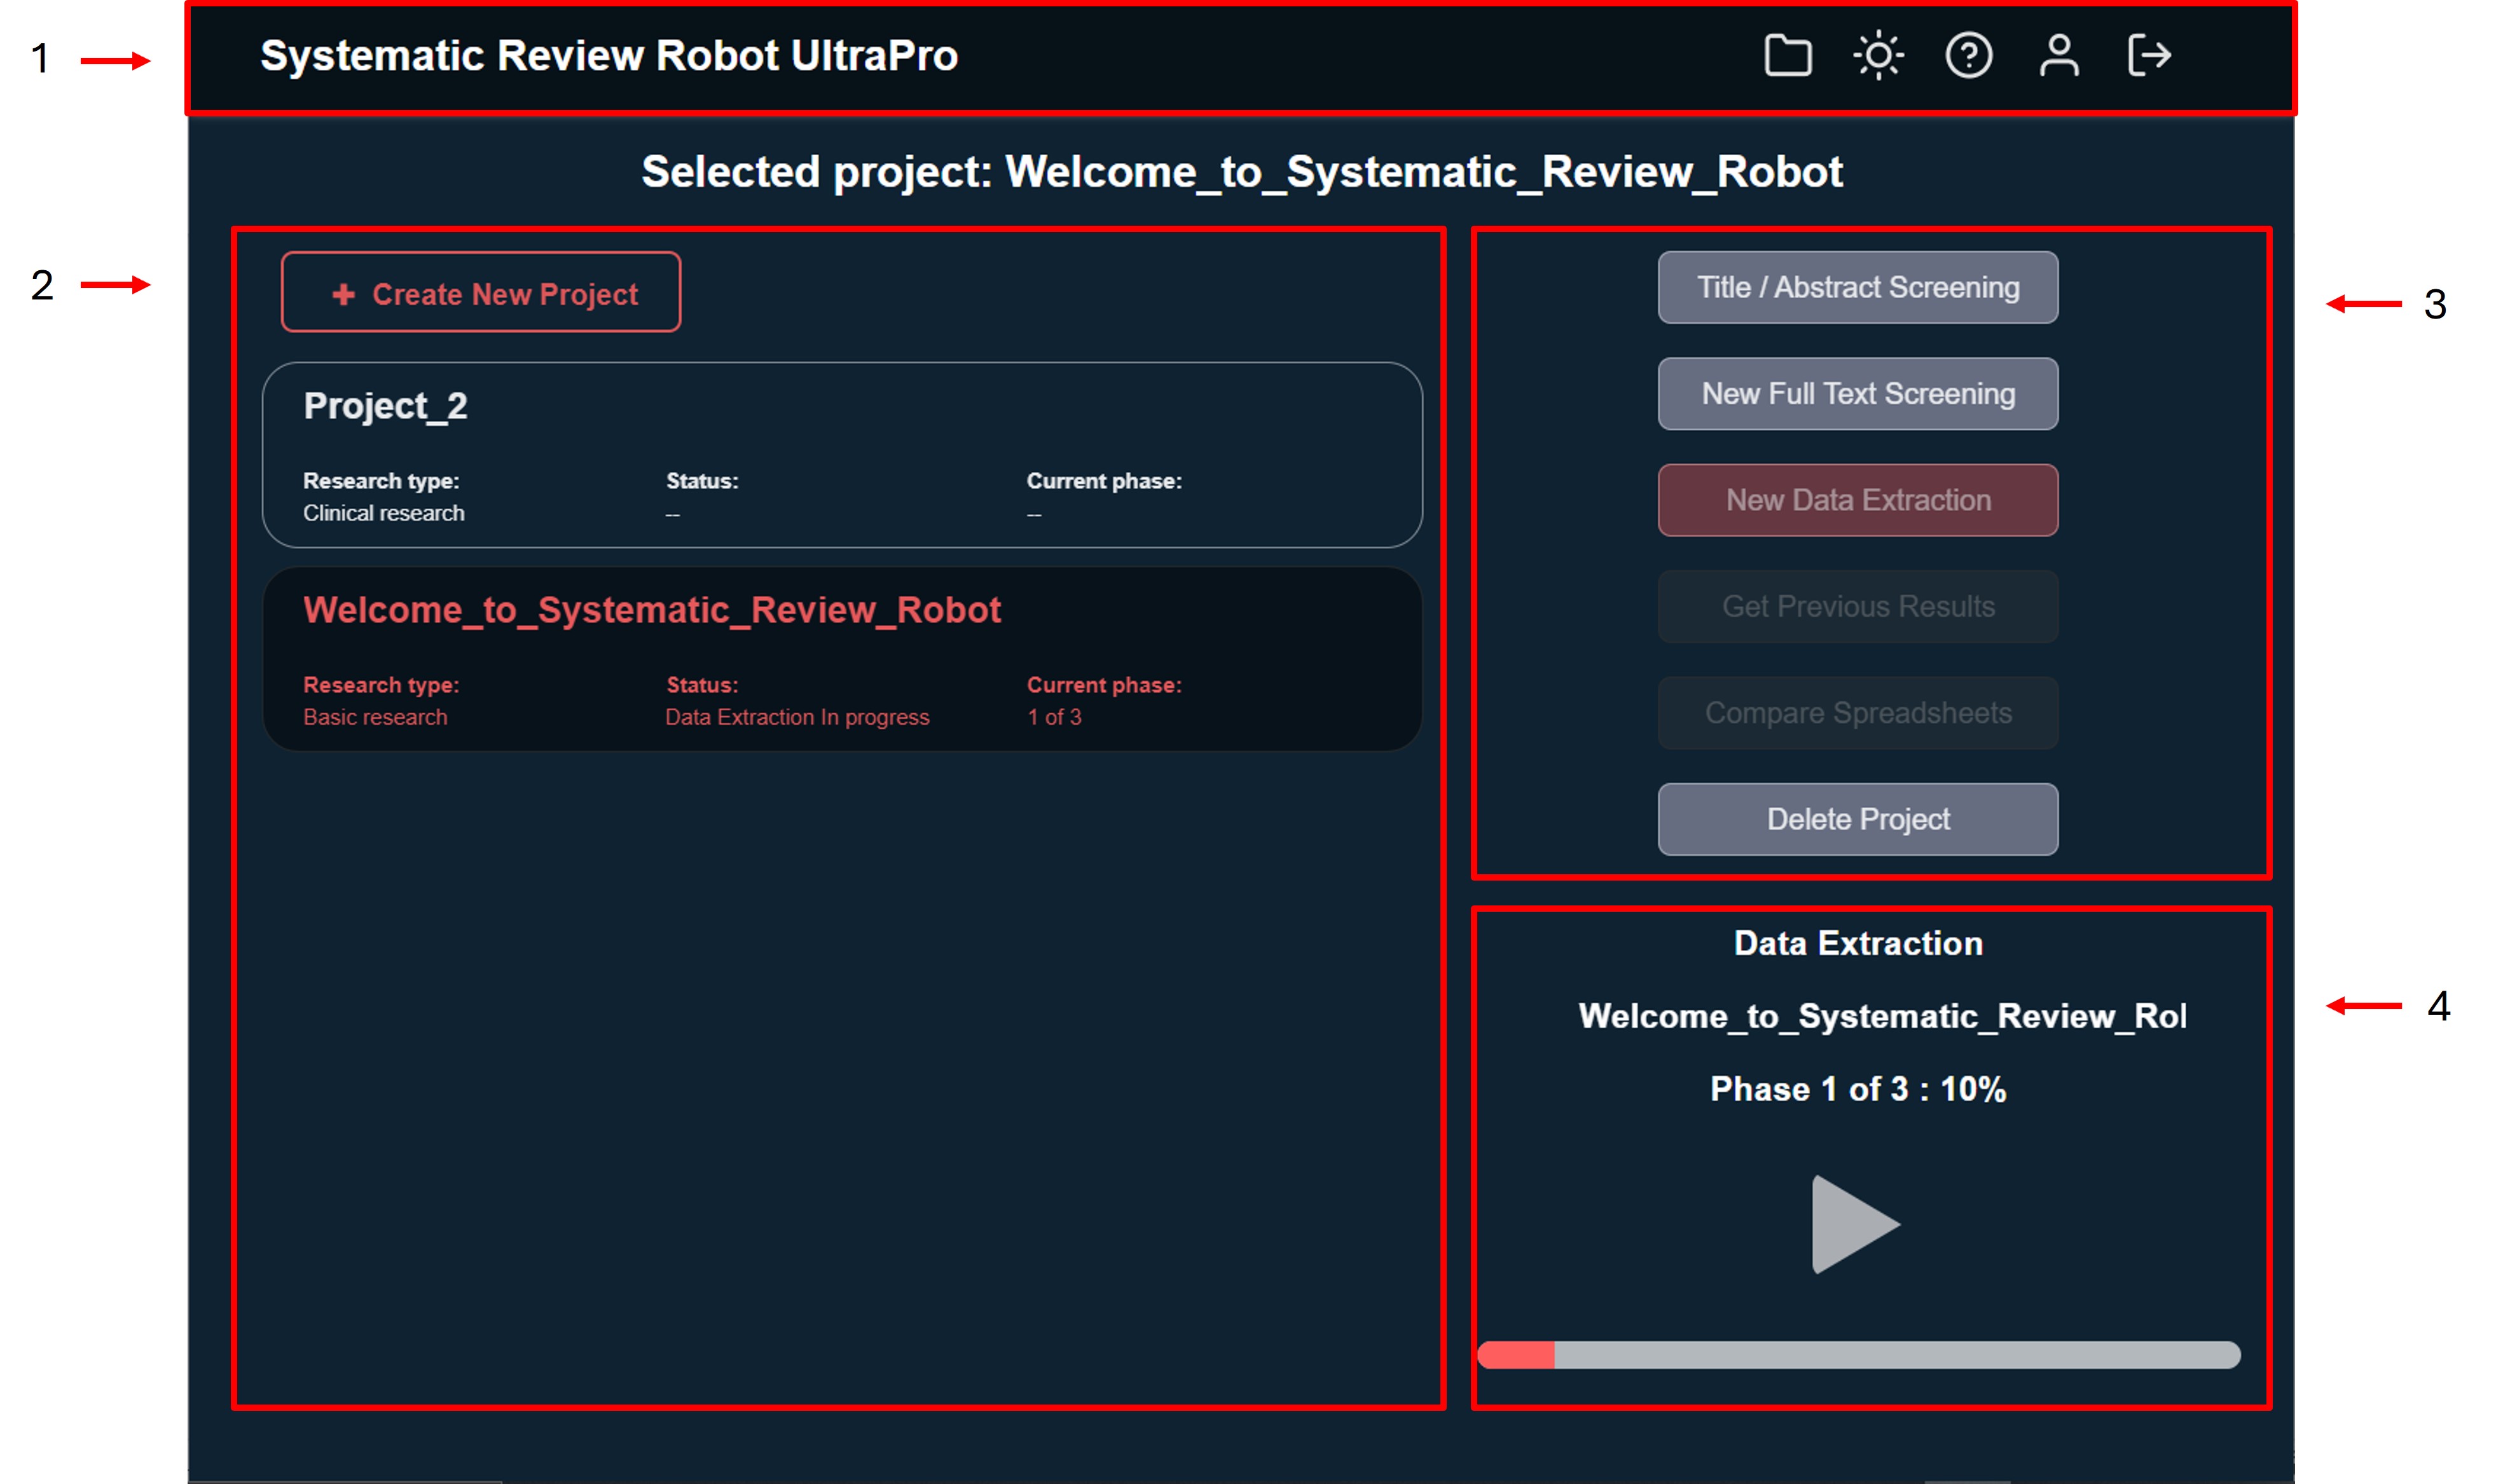
1. Top bar
In the top bar we have four buttons:
- to export the selected project. Once you have created a project you can export it to a folder by clicking this icon
- to change day/night mode.
- to open this online user manual.
- to manage your subscription status.
- to log out.
2. Project section
Here is where all your systematic review projects are displayed.
The currently selected project is displayed at the top of this section.
You can create a new systematic review project by clicking "Create New Project" at the top of this section.
For each project, it will display 3 important pieces information.
- Research type: display which research type you classified your project when creating it. Currently you can select between Basic and Clinical Research. This will have an impact on the algorithm to have better results on each case.
- Status: this will display the status of the systematic review action that your project is executing, such as Data Extraction incomplete/completed or Full-Text Screening incomplete/completed.
- Current phase: this will indicate in which phase of the systematic review process your project is at any given time. Depending on the action it could display phase 1, 2, 3 or -- (none)
3. Action section
Here are the actions that Systematic Review Robot can perform:
- Title / Abstract Screening:
- Full-Text Screening (for both Pro and UltraPro subscriptions).
- Data Extraction Screening (for UltraPro subscriptions).
- Compare spreadsheets (for UltraPro subscriptions). To perform a spreadsheet comparison of the latest data extraction from a selected systematic review project and your data extraction (.xlsx or .csv format).
- Get Previous Results. To recover the latest data extraction performed from a selected systematic review project.
- Delete Project. Finally you can delete a project by selecting this option.
4. Process progress bar, play/pause icon.
This is where the active project progress will be displayed.
It will display the currently active project, the process is taking place (data extraction or full-text screening), the current ongoing phase, as well as the percentage of the current phase.
With the button you can resume or pause the ongoing process of your active project whenever you want. Only one project can be active at any given time.
Manage your systematic review projects
Creating a project
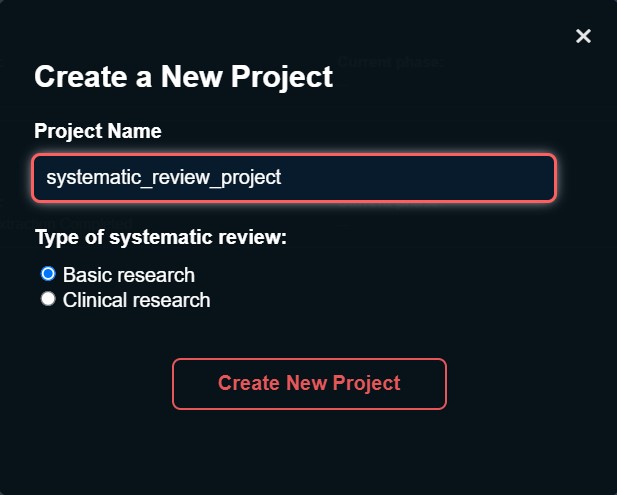
To create a new systematic review project, click the "Create New Project" button located at the top left of the project section. A menu will pop up.
Type the name of your systematic review project. The name can consist of alphanumeric characters and underscores ("_")
Select the type of your systematic review project. Basic research or Clinical research. This will help to improve the algorithm to have better results for any data screening and data extraction process.
Afterwards click "Create New Project" and confirm.
Your new project will be displayed in the project section.
Deleting a project
WARNING!
By deleting the project you will delete the results as well as the saved models for data extraction and/or full-text screening of that specific project. You will no longer be available to retrieve results for that project or to make new data screenings or data extraction using previously trained models for that project.
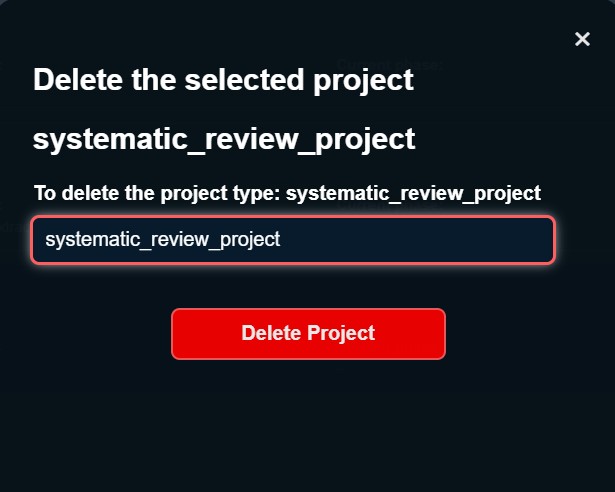
To delete a systematic review project, select the project in the project section and click the "Delete Project" button located at the bottom of the action section. A menu will pop up.
In order to delete the project you have to type the name of the project in the input section of the pop-up menu. Afterwards just click "Delete Project" and confirm.
How to do a title/abstract screening with Systematic Review Robot
Start by selecting your systematic review project and clicking the "Title/Abstract Screening" button at the top of the action section. In the pop-up menu, a reminder of the instructions will be displayed.
After selecting "Continue" The color legend for the title/abstract screening decision will be displayed. By selecting "Continue" once more, the program will ask for your inclusion and exclusion criteria.
Providing the inclusion and exclusion criteria
There are two options to provide the inclusion and exclusion criteria.
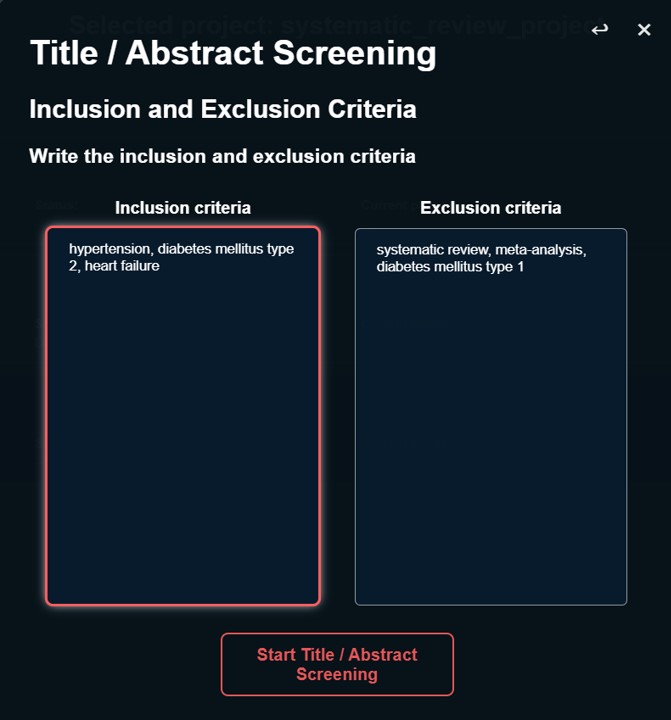
1. Write the inclusion and exclusion criteria.
- By selecting this option you will be prompt to a menu where you can copy and paste your inclusion and exclusion criteria in their respective input boxes.
- Each word or sentences used as inclusion or exclusion criteria must be separated by a comma. Example: diabetes, hypertension, heart diseases.
2. Provide a .xlsx or .csv file with the inclusion and exclusion criteria.
- By selecting this option you will be asked to select a spreadsheet (.xlsx or .csv file) containing the inclusion and exclusion criteria of your systematic review project.
- The .xlsx or .csv file with the inclusion and exclusion criteria must have the following format:
- The first and second columns must be named Inclusion and Exclusion, respectively.
- Each row of the spreadsheet must have only a word or sentence intended to be used as inclusion or exclusion criteria.

Providing the titles and abstracts of the research papers
After either of the two options is selected, you will be asked to provide a spreadsheet (.xlsx or .csv file) with the titles and abstracts of the research papers for screening.
The .xlsx or .csv file with the titles and abstracts of the research papers must have the following format:
- The first column must have the research paper id.
- The column containing the research papers' titles must be named "title".
- The column containing the research papers' abstracts must be named "abstract".

Select a path to save the results of the title/abstract screening
After Providing the spreadsheet with the titles and abstracts of the research papers, you will be asked to select a folder to store the results of the title/abstract screening.
After selecting the folder you will be asked to confirm your selections. Then the process will start. It will take a few minutes and a spreadsheet with the results will be saved in the provided folder.
WARNING!
If the selected folder is altered or deleted then the spreadsheet with the results of the title/abstract screening will fail to be saved and the process will need to be restarted.
Interpreting the title/abstract screening results
In a copy of the provided spreadsheet with the titles and abstracts of the research papers, a column with the screening decision will be added.
The possibilities of the decision suggestions will be color coded and are to include or exclude the paper, as well as unclear.
The "unclear" option means that the algorithm did not find any exclusion criteria in the title or abstract of that paper but it did not find sufficient data to include the paper either
The algorithm for this part of systematic review is designed to have higher sensitivity than specificity. In the case that an "unclear" decision is met by the software, we suggest to INCLUDE that research paper and filter it in the full-text screening process.

How to do a full-text screening with Systematic Review Robot
Start by selecting your systematic review project and clicking the "New Full-Text Screening" button at the top of the action section. In the pop-up menu, a reminder of the instructions will be displayed.
After selecting "Continue" The color legend for the full-text screening decision will be displayed. By selecting "Continue" once more, the program will ask for your inclusion and exclusion criteria.
Providing the inclusion and exclusion criteria
There are two options to provide the inclusion and exclusion criteria.
1. Write the inclusion and exclusion criteria.
- By selecting this option you will be prompt to a menu where you can copy and paste your inclusion and exclusion criteria in their respective input boxes.
- Each word or sentences used as inclusion or exclusion criteria must be separated by a comma. Example: diabetes, hypertension, heart diseases.
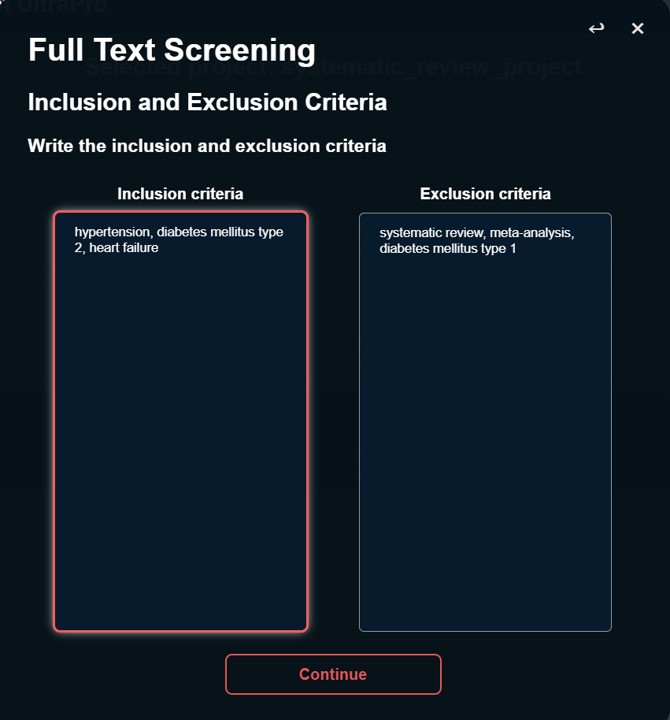
2. Provide a .xlsx or .csv file with the inclusion and exclusion criteria.
- By selecting this option you will be asked to select a spreadsheet (.xlsx or .csv file) containing the inclusion and exclusion criteria of your systematic review project.
- The .xlsx or .csv file with the inclusion and exclusion criteria must have the following format:
- The first and second columns must be named Inclusion and Exclusion, respectively.
- Each row of the spreadsheet must have only a word or sentence intended to be used as inclusion or exclusion criteria.

Providing an example of included and excluded research papers
After providing both the inclusion and exclusion criteria either by copy and pasting them in the input boxes or selecting a spreadsheet file, you will be asked to provide an example of included and excluded papers in the full-text screening
There are two options.
1. Write an example of included and excluded research papers.
- By selecting this option you will be prompt to a menu where you can copy and paste the reference ids of the included and excluded research papers in their respective input boxes.
At least one example of an included paper and one example of an excluded paper must be provided
- IMPORTANT! Each reference id must be equal to the name of the PDF file that you will provide for the full-text screening (minus the .pdf). For example, if the PDF file name is RefID 6.pdf, the provided example must be RefID 6.
- Each reference id must be separated by a comma. Example: RefID 6, RefID 9, RefID 15
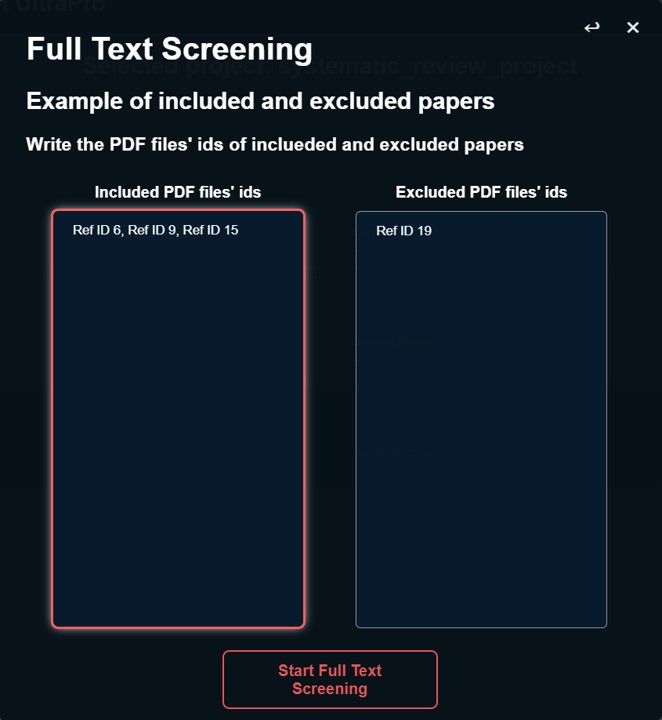
2. Provide a .xlsx or .csv file with an example of included and excluded research papers.
- By selecting this option you will be asked to select a spreadsheet (.xlsx or .csv file) containing an example of an included and an excluded research paper in the full-text screening phase of your systematic review.
At least one example of an included paper and one example of an excluded paper must be provided
- The .xlsx or .csv file with the inclusion and exclusion research papers reference ids must have the following format:
- The first and second columns must be named inclusion and exclusion, respectively.
- IMPORTANT! Each reference id must be equal to the name of the PDF file that you will provide for the full-text screening (minus the .pdf). For example, if the PDF file name is RefID 6.pdf, the provided example must be RefID 6.
- Each row of the spreadsheet must have only one reference id of the included or excluded research paper example.

Providing the PDF files of the research papers used as an inclusion and exclusion example
After any combination of the four options is selected, you will be asked to provide a folder with the .pdf files of the research papers used for the training example.
Providing the PDF files of the research papers used as an inclusion and exclusion example
Then, you will be asked to provide a folder with the .pdf files of the research papers that you want the software to perform a full-text screening process.
Select a path to save the results of the full-text screening
Finally, you will be asked to select a folder to store the results of the full-text screening.
After selecting the folder you will be asked to confirm your selections. Then the full-text screening process will start. Depending on the number of papers to analyze and your system capabilities, it could take up to 48 hours to complete a full-text screening process of 100 research papers.
After the process is completed a spreadsheet with the results will be saved in the provided folder.
WARNING!
If the selected folder is altered or deleted before the process is completed then the spreadsheet with the results of the full-text screening will fail to be saved and the process will need to be restarted.
Interpreting the full-text screening results
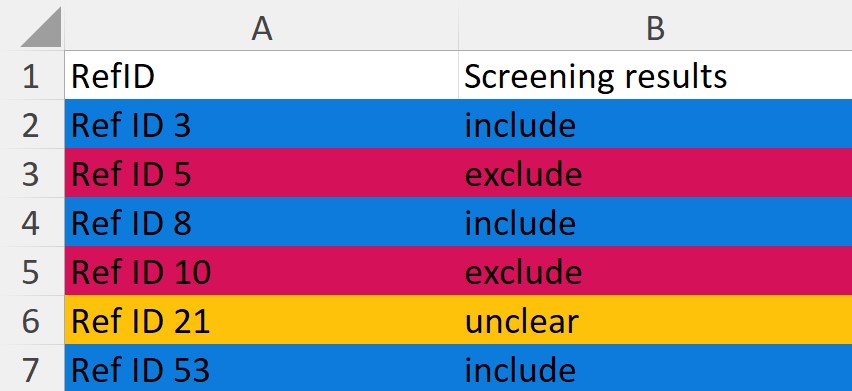
The results will be a spreadsheet with the reference identifiers and the screening result suggestion.
The possibilities of the decision suggestions will be color coded and are to include or exclude the paper, as well as unclear.
The "unclear" option means that the algorithm did not find any exclusion criteria in the title or abstract of that paper but it did not find sufficient data to include the paper either
The algorithm for this part of systematic review is designed to have higher specificity than sensitivity. In the case that an "unclear" decision is met by the software, we suggest to revaluate the research paper and ultimately go with the human researcher decision.
Pausing and resuming a full-text screening process
At any time you can pause your current full-text screening process by selecting the pause button at the bottom right corner of Systematic Review Desktop
Is important to notice that if the program is closed or interrupted, the process will pause automatically. You can resume the full-text screening process by clicking the play button at the bottom right corner of Systematic Review Desktop
Also, if the program is closed completely, you can resume the full-text screening process by selecting the systematic review project and then clicking the "Resume Full-Text Screening" button.
Using previously trained models for faster full-text screening
After a full-text screening process is completed for a systematic review project you can perform a new full-text screening process of other research papers with the previously trained models for that project.
You just have to select the systematic review project in the project section and then click "New Full-Text Screening"
After following the previously mentioned steps, a pop-up message will ask you if you want to use the previously trained models for that full-text screening
By selecting "Use Current Models", you will only be asked to provide the .pdf files of the research papers you want to perform a full-text screening, as well as the folder path to save the results of the full-text screening.
Using previously trained models for full-text screening will result in a faster full-text screening process.
How to do a data extraction with Systematic Review Robot
Start by selecting your systematic review project and clicking the "New Data Extraction" button at the top of the action section. In the pop-up menu, a reminder of the instructions will be displayed. Click on the "Start Data Extraction" button to begin.
Providing a training spreadsheet
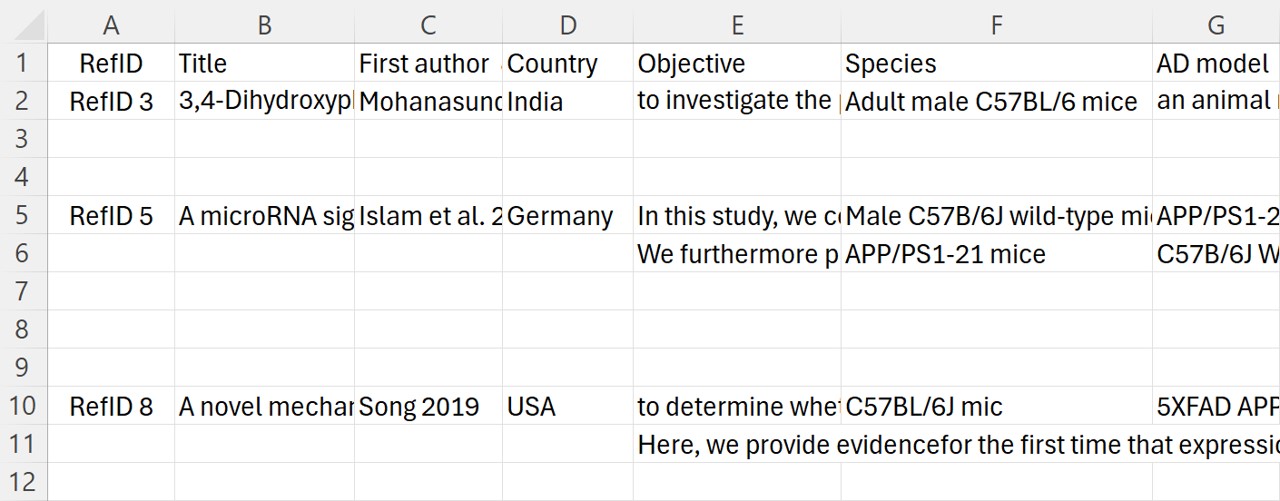
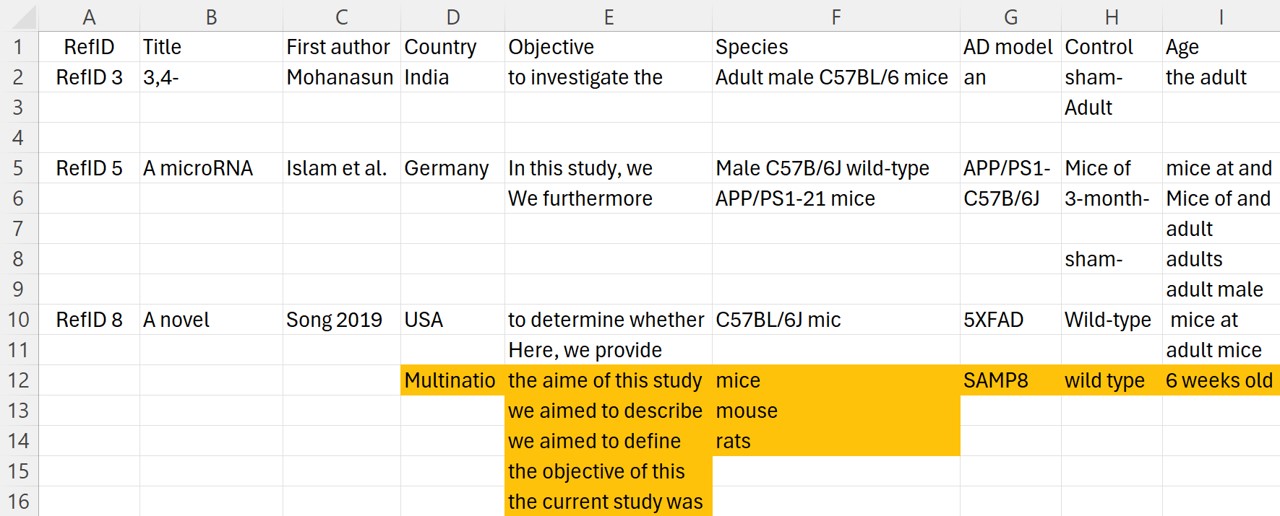
You will be asked to provide a spreadsheet (.xlsx or .csv file) with the data extraction of some research papers.
We recommend to extract the data of at least 5 research papers .pdf files in the training spreadsheet for improved results, but extracting at least one research paper .pdf file is enough.
IMPORTANT! The format for this spreadsheet will depend on your project. The name of each column objective must be stated on the first row, for example Title, Objective, Mortality, etc.
IMPORTANT! For the example of this data extraction it is important to copy and paste the complete sentence from when you obtained the results.
IMPORTANT! All the extracted data must be within the first sheet of the spreadsheet, the other sheets of the spreadsheet will be ignored
Providing a spreadsheet with specific terms for the data extraction (optional)
After providing the training spreadsheet you will be asked if you have another spreadsheet with specific terms that you would like to add to the data extraction.
This is useful if, for example, you know some specific terms that will be in some columns, but did not included those terms in the provided training spreadsheet.
Similarly, be sure to provide a specific term per row in the column that it would be used.

Alternatively, instead of providing a .csv or .xlsx file with the specific terms, you can add them to the Training spreadsheet at the end of their corresponding columns.
Providing the PDF files of the research papers extracted in the training spreadsheet
After providing a training spreadsheet and optionally an specific terms spreadsheet you will be asked to select the folder containing the .pdf files of the research papers used for the training spreadsheet data extraction.
IMPORTANT! The .pdf files extracted in the training spreadsheet must be separated in a specific folder from those .pdf files you want to perform a data extraction.
Providing the PDF files of the research papers for data extraction
Then, you will be asked to provide a folder with the .pdf files of the research papers from which you want the software to perform a data extraction.
IMPORTANT! The .pdf files extracted in the training spreadsheet must not be in the folder with the .pdf files you want to extract new data from.
Select a path to save the results of the data extraction
Finally, you will be asked to select a folder to store the results of the new data extraction.
After selecting the folder you will be asked to confirm your selections. Then the data extraction process will start. Depending on the number of papers to analyze, the number of objectives (columns) in your spreadsheet, and your system capabilities, it could take an average of 72 hours to complete a data extraction process of 100 research papers.
After the process is completed a spreadsheet with the results will be saved in the provided folder.
WARNING!
If the selected folder is altered or deleted before the process is completed then the spreadsheet with the results of the data extraction will fail to be saved. However you can recover this results with the "Get Previous Results" option (se below).
Interpreting the data extraction results
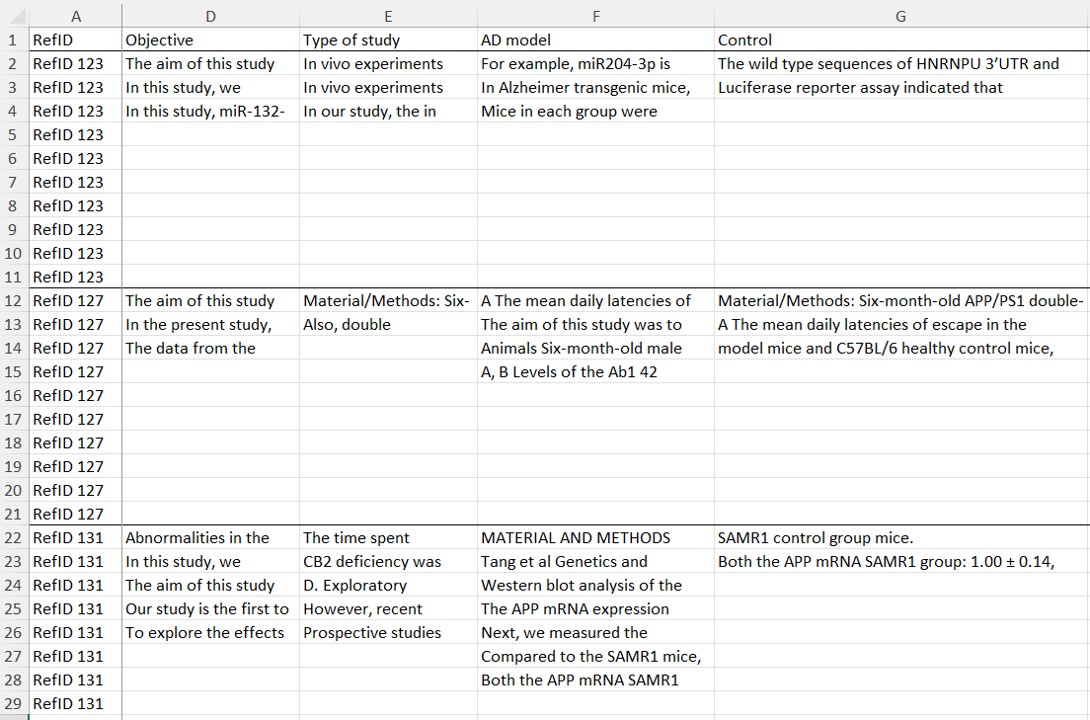
The results of the data extraction will be displayed on a spreadsheet based on the training spreadsheet that you previously provided.
The algorithm behind Systematic Review Robot is program to trained based on your examples on how to extract data from research papers. Because of this, it will extract data in a similar way to what you would have extracted with the advantage of increasing its detection for missing information.
Because of this, Systematic Review Robot will return a up to the ten most likely data to be extracted for any given for any given data extraction objective (column) and research paper (row). However, in most cases it will return from 2 to 3 possible answers for each data extraction objective and research paper.
The returned possible answers for any given data extraction objective and research paper is in the form of sentences when the needed data is most likely to be found.
If the data requested is numerical, it is important to try to give examples when this data is located in sentences or paragraphs. Nonetheless, Systematic Review Robot will try and find this information in tables.
To simplify the process of comparing your data extraction with the Systematic Review Robot data extraction, you can use the "Compare Spreadsheets" option (see below).
Pausing and resuming a data extraction process
At any time you can pause your current data extraction process by selecting the pause button at the bottom right corner of Systematic Review Desktop
Is important to notice that if the program is closed or interrupted, the process will pause automatically. You can resume the data extraction screening process by clicking the play button at the bottom right corner of Systematic Review Desktop
Also, if the program is closed completely, you can resume the data extraction process by selecting the systematic review project and then clicking the "Resume Full-Text Screening" button.
Using previously trained models for a faster data extraction
After a data extraction is completed for a systematic review project you can perform a new data extraction of other research papers with the previously trained models for that project.
You just have to select the systematic review project in the project section and then click "New Full-Text Screening"
After following the previously mentioned steps, a pop-up message will ask you if you want to use the current trained models for the data extraction
By selecting "Use Current Models", you will only be asked to provide the .pdf files of the research papers you want to extract data from, as well as the folder path to save the results of the data extraction.
Using previously trained models for data extraction will result in a faster data extraction process.
Getting previous results
Systematic Review Robot saves in your system a spreadsheet copy of the latest data extraction completed for any given systematic review project.
When a data extraction for a systematic review project is completed, the "Get previous results" option will be enabled. By clicking it, you will be asked to select a folder to save the latest results of a data extraction.
Afterwards, you will find a copy of the Systematic Review Robot data extractions results of that project in the provided folder.
Comparing data extraction spreadsheets
When a data extraction for a systematic review project is completed, the "Compare Spreadsheets" option will be enabled. By selecting it, you will be prompted to a pop-up menu with the instructions. By selecting Continue you will be asked to provide the following:
1. A spreadsheet (.xlsx or .csv file) with your data extraction.
2. A folder to save the results of the data extraction comparison.
IMPORTANT! The spreadsheet with your data extraction must have the same data extraction objective names as the Systematic Review Robot data extraction spreadsheet. Also the research papers ids must match in both spreadsheets (see image below)
Interpreting the results of the data extraction comparison.
Systematic Review Robot will generate a copy of you data extraction and the generated data extraction.
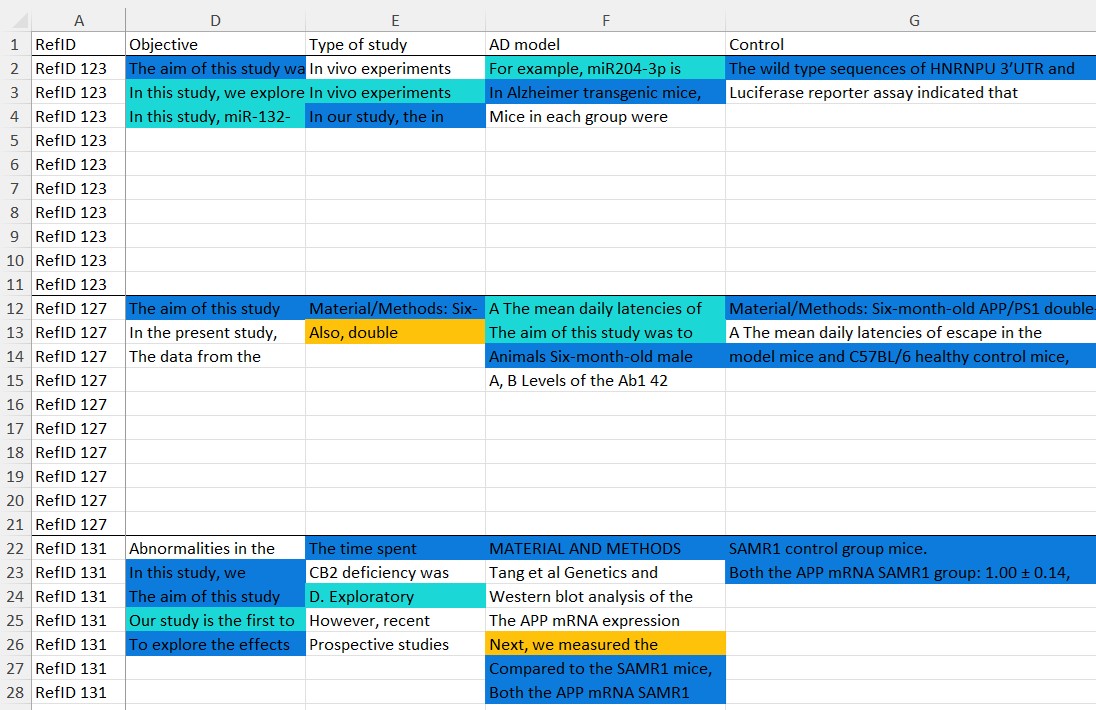
The cells from each spreadsheets will be colored coded based on the percentage of match to the corresponding cell (per data extraction objective and reference id) in the other spreadsheet.
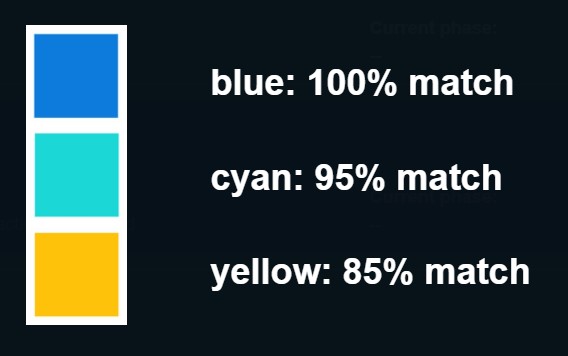
The background color of each cell will signify the match percentage between both data extractions.
If a cell is not colored, it means that it was not matched when compared to the corresponding cell.
Still have questions
Check our frequently asked questions sections to learn more.